testing tyre walls

 Cadwell was going quite well till race three where I decided to use a tyre wall to retard my progress off the exit of the hair pin...

I did get to watch the rest of the race from the side lines and collect my thoughts which were rattling around the inside of my now distroyed Shoei NXR helmet.
 Not long later I was in the back of one van heading back to the pits then another home to fix the bike and my pride.
What broke?
Aside from collecting a lot of Cadwell parks grass and soil in my fairing, things were not looking too bad considering.
 My screen had exploded which was a given and the throttle cables were split open and bent round although not severed.
The only other thing to really touch down was the end can which was now quite bent and the handle bar which had folded into the tank a little and popped the brake leaver.
Not a terrible amount of damage then!

Getting it fixed
I had a month to fix the bike before Croft so I shouldn't have been under too much pressure. However I had planned to go to Blyton park on the Honda CBR400 NC29 which also needed work so I wasn't exactly flush with time or money.
The trottle cables were a simple fix using some putty and some pliers to straighten things up a bit. This got the cable guide back into shape and back into service. The cost of replacing throttle cables isn't too bad but cutting and soldering them is a pain in the ass!

Off came the exhausts for a quick wack with a hammer when I spotted they had cracked in the crash. No matter
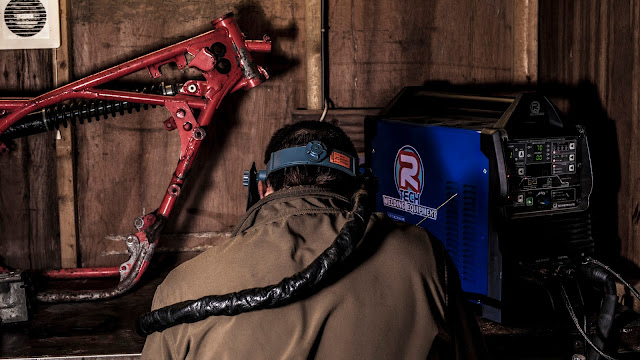
Having convinced them roughly back into shape I popped the pipe into the shed and welded the crack up with my trusty R-tech Digi AC/DC Tig 170 followed by a quick repaint.
The pipe is a bit more tucked in now which is no bad thing!

Whilst I had things apart I got a new gear shifter/ selector rod ordered. A big reason I had got myself into the mess I was in was due to missed gears costing me time and I wanted this issue gone.
Whilst I had the engine open to change the gear selector rod I had also planned to give the gearbox a good look over with my trusty Andy helper helping me out.

 With the engine out and apart I was able to take a look at my gears which for a bike of its age were not looking terrible.
I did manage to remove some hot spots from the shaft and swapped a few gears for fresher ones. The shims were pretty good so I left these alone as I didn't have the shim kit in my hand and didn't want to leave the engine open up to the last minute.
Everything was thrown back together complete with new selector rod which can be fitted without splitting the cases (just pop the clutch cover off, swear, clean up oil spill, remove circlip and push out).
Whilst I had things apart I also removed the kick start and idler gear.
The cases were welded up with an aluminium plug which came out well after a bit of practice (who said Tig on ally was easier?

The fairing stay was hammered back into shape and fairing was fixed with some polyurethane adhesive supported by a little plastic mesh for reinforcement on the inside.
Finally a new screen was drilled and fitted to the front fairing with well nuts as before.
All was ready for Croft and after much faffing with hours to spare for the drive up there. Situation normal then!
I don't mind breaking my bike if I had plenty of fun in getting there.


Comments
Post a Comment