Posts

Showing posts from 2017

May the force be with you

Image
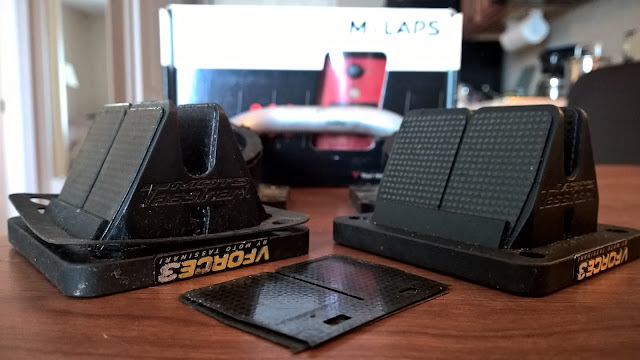
 Reed all about it: I got me some Vforce 3 reads! At $137 with manifold rubbers and some spare reeds they were an absolute steal so it would have been rude not to pick them up during a recent trip state side. They were however: well used and in need of a clean so that was going to be my first job when I got them home. The reeds, stuffer blocks and cages are easilly seperated by pulling apart and witdrawing the centre reed holding pin. Once apart I could give everything a thorough clean and inspect. I found a few of the reeds were getting a bit fragile and worn on the edges so some of the spares were quickly swapped in for the dodgy reeds. Once all was clean the reed blocks were reassembled. Being Banshee reed cages they are a fair bit bigger width wise to the standard RD250D cages but seeing them drop into the inlet of a spare YPVS engine  reassured me they should fit knowing others ran with YPVS reeds in their bikes. Things would need modifying but it was possible.

Stay a little longer

Image
It would appear that my spill at Cadwell had caused more damage than I had first realised. First the headrace bearings collapsed on me during practice which made the bike handle like the front tyre was flat (pretty scary on a race track). This was easily fixed with a spacer after some time spent with hammers and files. Next, during race one, my rear fairing bracket fell apart letting the fairing drop. Luckily the top and nose brackets were strong enough to handle everything to the extent that I didn't even notice till I spotted the gap under my exhaust post race. The main bar was still intact so some tie wraps did the job of picking the fairing up for the weekend but a fix would be needed. I contemplated repairing the original bracket but decided that due to; it being a bit bent, could well fail again proving I am terrible at welding and it weight a bloody tonne; I would need to replace it. I hunted in the garage and found some 12.5mm high temperature

testing tyre walls

Image
Cadwell was going quite well till race three where I decided to use a tyre wall to retard my progress off the exit of the hair pin... I did get to watch the rest of the race from the side lines and collect my thoughts which were rattling around the inside of my now distroyed Shoei NXR helmet. Not long later I was in the back of one van heading back to the pits then another home to fix the bike and my pride. What broke? Aside from collecting a lot of Cadwell parks grass and soil in my fairing, things were not looking too bad considering. My screen had exploded which was a given and the throttle cables were split open and bent round although not severed. The rear fairing stay had punched through the fairing in a neat round circle which meant the fairing got out of the way whilst the bike slid which saved the paint and only needed a simple repair. The only other thing to really touch down was the end can which was now quite

Stay now

Image
 Post Mallory park, I had a problem: The bike hadn't broken and I didn't know what to do with myself... ...Time to sort out some of those little niggles.  One of those little niggles was the rear fairing stays. Apart from being a ticking time bomb of fragility, they also get right in the way of my knees. As a result the fairing was starting to suffer and I was constantly conscious that I might knock one off, ending my racing weekend. I decided to copy a bracket idea I had seen on another bike using some 12mm steel bar and 20mm box section. Ideally I have used tube but nobody local to me stock any and I wasn't going to wait for a delivery. The bar was cut to length, drilled on either end and tapped for an M6 bolt. I made sure to drill as deep as the bit would allow in order to reduce weight as best I could. This bracket was going to be a lot heavier than what I was replacing. The bar was test fitted and markings were taken for where the box section arms

Exhausting work

Image
As things continuously vibrate themselves off my bike it was clearly time for my exhaust to drop off.  Which it did.  The plan During my one and only full trip round Pembry race circuit in Wales my left exhaust bracket cracked through as you can see on the right. Thankfully my fairing caught the exhaust resulting in little damage and a functional machine so no major problems there. Now back home and post some discussion with Andy Green; I had decided to make new mounts that should survive a little better than what I had. The straps on the pipes were something the previous owner had used and I had cobbled some sheet and rubber spacers together to marry them up to my frame. The solution proposed to me was to use tubular engine mount bushings in some steel tube that would be welded to my frame. The exhaust would then marry up to these bushes via some split box section . The box section would be welded to the pipe via a stress spreading sheet that would be welded on t

More bling.

Image
A comment here and a chance encounter there and I had managed to replace my rear caliper after just two race meets. Here's how & why... It is probably pretty telling that the best picture I have of my red Brembo(ish) caliper is captured with the bike on its side. The Yamaha Aerox caliper was very cheap at £27 new with pads and worked just fine as a low cost Brembo rear caliper alternative. It had three flaws however: It was red. I kind of liked the way it worked with the accent red stripe but was getting mixed reviews from others. Risk of damage to the bleed nipple in a fall. The pads had all but fallen apart. Clearly colour and pads are easily fixed with paint and a quick order to EBC which was on the way anyway. A chat with Andy Green (we have lots of these) had come to the conclusion that a bleed nipple banjo bolt and a blank would reduce the risk of damage easily. It  was whilst looking into other sources of this very cheap caliper for another racer that I spo