Rolling lite

Shopping
With the winter maintenance season on its way I started looking for parts to get the bike where I wanted it for the 2017 season.
Wheels were high on my shopping list as the stock cast wheels weigh a fair bit.
I wanted a set of Astralites but they are very expensive. Spoked wheels were going to be the more likely option but getting a good set was't very cheap either.

As it happened this pair of Astralites came up cheap on eBay for only £250 with the added bonus of all the spacers for an RD250 fit.
They were still in their original anodised finish with the only draw back being a few dents in the rims that would need ironing out.
Straightening things up
I spent a long time trying to get in contact with the Tony Dawson and Paul Allender. Tony being the man who brought the Astralite wheel to us and Paul the man who brought them back after a 10 year gap. Paul was selling the wheels again on RennStar but sadly they have recently announced that they are ceasing production again. Many phone calls and emails finally let me know that there would be no more new wheels coming out of the factory for a while and maintenance was off the cards too sadly.
In the mean time I had tried both wheels out on the RD with a variety of spacers and the new (and as yet not altered) FZR400 front end loosely bolted in place. This showed I was going to need some new spacers making up so I can only assume these wheels were fitted to a different model of RD before.
Not perturbed I split the wheels down from their disk and sprocket mounts, spaces etc ready for straightening. This involved a lot of lube, heat and hammers.
As it became clear later that the wheels weren't going back to the factory thought I saw that they would need to be rebuilt to get them to spin up. Thankfully breaking them down has given me the opportunity to clean the hubs up a bit so rebuilding wasn't a complete nightmare.
I was now in the business of looking into alternative repair shops. Most places I spoke to were either unsure of what an Astralite wheel even was or if they did were not fancying working on such a potentially fragile Mag allow wheel. A place in Doncaster looked pretty good with lots of jigs and a long history of alloy wheel repair, there is also a huge place in Birmingham that used to make spoked wheels for Triumph but in the end I went for Wellspeck based in Newark. I spoke to the chap on the phone at length. Although he hadn't worked on an Astralite wheel before he had at least heard of them and had plenty of experience with mag-alloy wheels and split rims. A walk round his workshop and an agreement on the cost had me leaving the wheels with him whilst I went away with work for a few weeks.

Everything was straightened up nicely, a new seal had been made and the finish had been brightened up too. Sadly the blasting had removed some patches of anodization but I couldn't get too upset as they were pretty grotty before.
All in all a good job done by Wellspeck now broadening the world of people who we can be confident in dealing with our Astralite wheels.
Mounting

Back in the garage and with March rapidly approaching; it was time to get these things on my bike.
Spacers were made up using some Alloy bar and the use of my friend Andy's lathe which was a most enjoyable return to machining.
Later on a Renthal sprocket arrived from the my faithful supplier: eBay.
Whilst bolting on said sprocket I came across the broken end of a bolt stuck in the hub.
I stuck a drill through it planning on drilling it out completely and sticking a Helicoil in as I had that size kit anyway, but once I had drilled it I thought I would at least try an easy out.
Much to my surprise it actually worked! I can't remember the last time I had any joy with an easy out but this one managed to pull out this well soaked but very rusty bolt end.

New bolts were drilled with wire locking holes for the disk and sprocket. Well I got as far as the disk and ran out of the time and new bolts to do the sprocket ones. This would later nearly bite me in the ass as, even with locking washers, some worked their way out enough for me to raise an eyebrow after my first race.
The Brakes
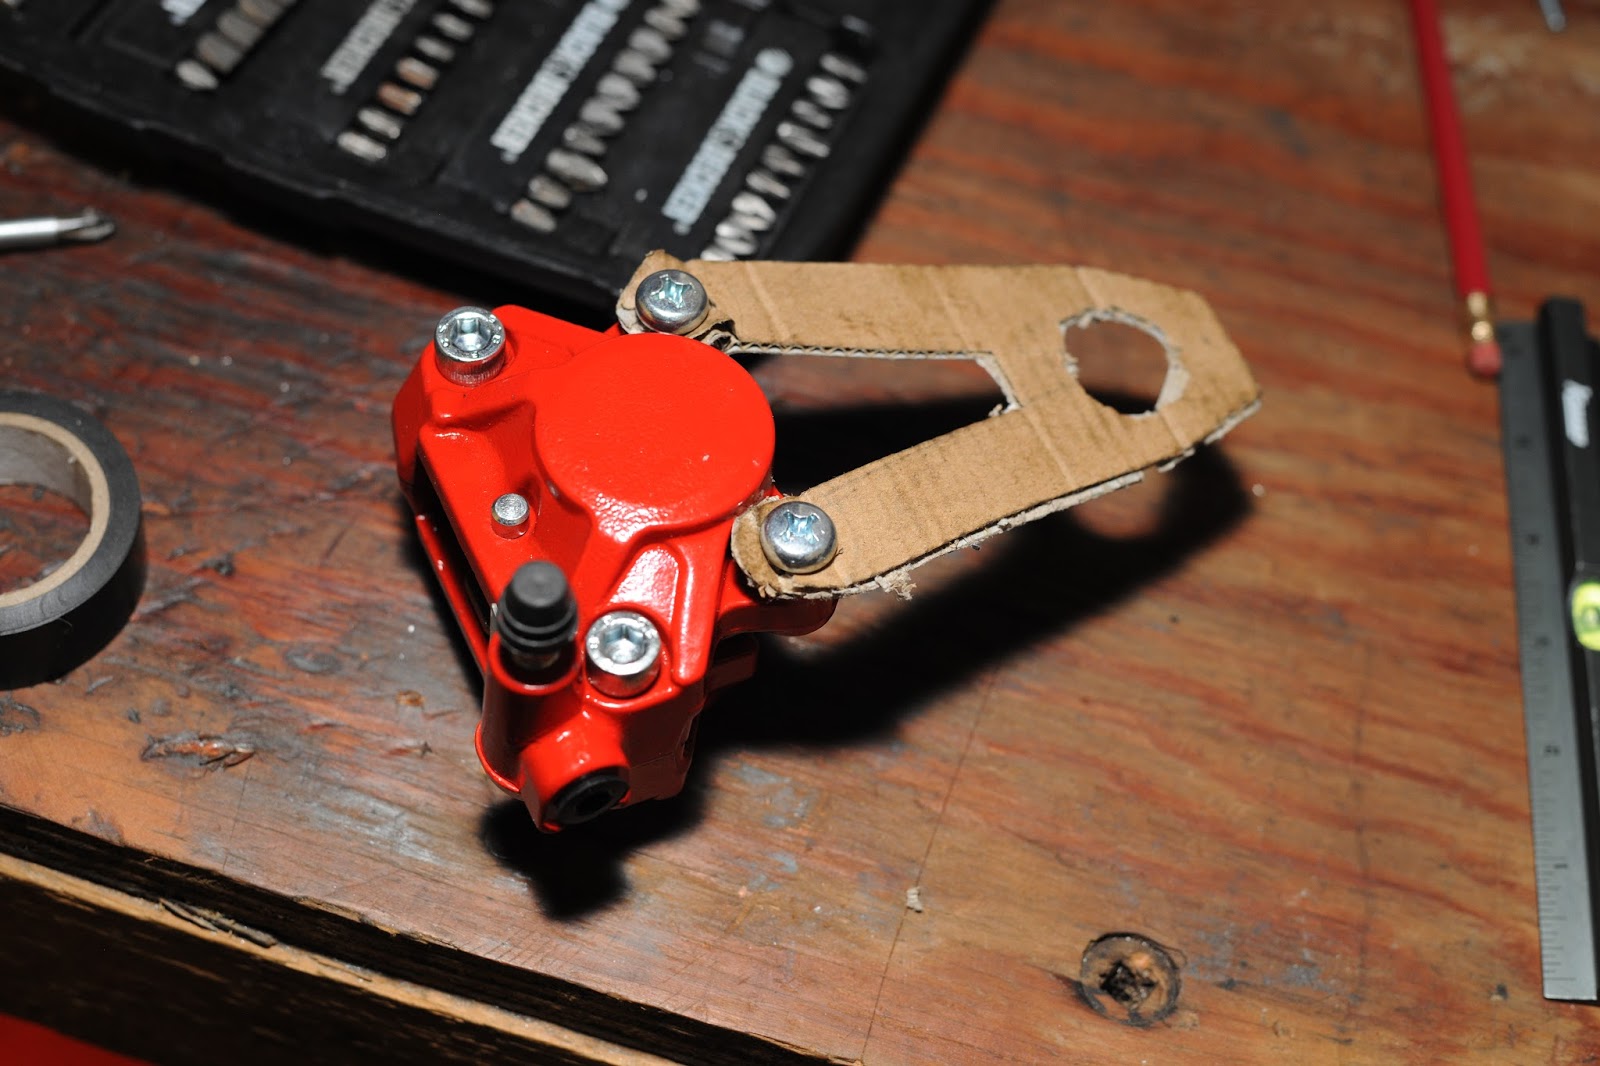
This wouldn't do so after a bit of research and general chatter I opted to go for an under slung Brembo caliper with DIY brackets.
My "Brembo" came of a scooter and cost my just £25 brand new which is less than a set of brake pads normally!
 A suitable disk was located with the aid of the ever helpful Andy which would not only save me space but also substantially reduce my unsprung weight.
I roughed out a bracket out of card so the caliper would sit right on the disk with the aid of some washers acting as spacers. Next I copied this out onto some 6mm ally with an added tab for a tie bar.
The bracket was roughly cut out and drilled to check for fit. Once I was happy that this would work I tidied everything up and gave it a good coat of black.
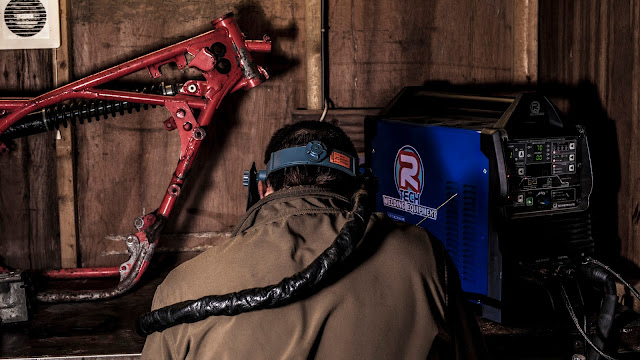
I then made a simple tie bar out of more 6mm sheet. This was married up to an 2mm thick L bracket made from folded 1mm steel sheet which I closed all the seams on with my new R-Tech AC/DC Digital Tig 170. This was then welded to my swing arm allowing me to bolt everything together. Welding different thicknesses of material is not easy, especially upside down as a YouTube taught novice! Thankfully the welders easy DC program and some creativity with the Amperage saw me through.
Finally I had the back end sorted, well apart from finding out the monster rear tyre wouldn't fit in the swing arm requiring me to lengthen the chain that is. Much thanks go to B&C Express for taking the time to dig around their warehouse to find me a suitable split link.
 The only thing left for the front end was a mount for the Grimeca 2- Piston Caliper and a disk. The sooner was much easier to do once I had a disk fitted. Whilst waiting on a new one from EBC I pinched one off of Andy's Formula 3 bike as he was dropping to a single disk on that bike anyway.
I hit a problem with my bolts being too short but thankfully my trusty local supplier Lincs Fasteners Co quickly had me sorted with a hand full of the required length bolts.
With the disk on, it was a simple enough job to make a bracket by picking up holes on a roughed out sheet of 6mm ally and once I was happy I tidied things up and bolted everything together using washers to space the caliper out accordingly.
I finished the job by cutting down some 10mm bolts and drilling wire locking holes for additional locking to the nylock nuts.
This bracket wasn't painted for another 4 months (after this blog entry was published whaaa???) as that little job was picked up whilst upgrading the pads to EBC's race pads. The caliper had already proven to be powerful but with these it should be world stopping!
To finish the front and rear brakes I needed lines. The front was too long and rear too short. I solved this problem by sticking the front line on the back and buying a nice new black Hell hose from B&C Express who made it for me whilst I waited in their shop. How good is that?!
A fresh pair of boots came in the shape of some super sticky Heidenau tyres from Tony Salt Tyres to finally finish off this job.
Results
This was a lot more work than I had initially anticipated with my "RD fitting" Astralite wheels but the results really make a huge difference.I may tidy the front bracket up a bit more in the future but she did the trick nicely and had me ready for race day just in time. The rear bracket tie bar could do with the ability to hinge during wheel changes which is something I will look into another time. The rear hose will be replaced once I change to rearsets which will require a shorter hose again.


This comment has been removed by the author.
ReplyDelete