More suck, Better squeeze for a bigger bang and space to blow.
At the end of the 2016 season I had to return a lot of loaned parts. That included the carbs (2 sets), exhaust and even the crank.
These have been grouped together to pick out the interesting bits of this part of the build.
Suck
My standard carburetors had to go back to Andy and I had already returned the set that I actually raced with to Sy. The bike had already been stripped for parts by Ian who borrowed it to try and make Silverstone on his own machine but sadly his back had other ideas so I didn't need to pull as much apart here.
New Mikuni VM32 carbs were supplied from eBay USA for nearly half the price I can get them in the UK. Thankfully I was state side so the shipping was cheap too. I found it cheaper to buy them separately rather than as a pair but care has to be taken to get a Left and a Right carb as the idle screw will be masked on the right carb otherwise.
I also ordered a set of new throttle cables as my current (one sodding race old) cables had the wrong fittings on them, my current jet set would transfer over though so at least I didn't need new jets. I should have bought some inlet rubbers too but that detail was missed out in conversations so I was none the wiser till it came to trying to fit them.

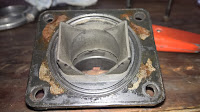
So naturally when I did try to fit the carbs [once the engine was in, clearly this is 'such, squeeze, bang, blow thing' knocks the chronology out a bit] I hit an unforeseen problem.
As time wasn't on my side by now; I went for a light grinding of the inlet rubbers as my solution.
 I started with a Stanley knife on the inside to remove the big bits followed by the lip on the inlet side.
I then used a dremel and a pencil air grinder to work round the inlet and to tidy up the inside till everything was big enough to squeeze the VM23's in.
Once all was reshaped the inlet rubbers were cleaned and a light coating of petrolium jelly was used to protect the rubber and on mating surfaces.
 The new carbs were fitted, then removed and refitted on the correct sides. A lot of persuasion was needed to ease the carbs in but thankfully the Jubilee clips held them in place nicely.
On an aside, why are Jubilee clips still imperial? I was most disappointed when I had to get a 1/4 socket out, come on guys it's 2017.
Next up throttle cables and this time I had proper throttle cable kits from pyramid parts.
The already soldered end fit the carb perfectly with no nipple required. so I worked backwards.
 the Mikuni top nut has a small cable fitting for which the kit has a coresponding fitting. bizzarly though the cable guide end is too small for the complete cable guide to sit in like it should so I had to cut the protective rubber back to get it to fit.
With the carb end of the cable build and fitted I ran the cable up through the frame to the handlebar where I tried different lengths of guide till I was happy what I needed to chop off.
Then, as the open end of the guide was the carb end (the other end is already fitted as normally you start at the throttle and work down the bike) , The guide was removed, cut and sanded down before refitting.
When I was happy the guide was the right length I then offered up the inner bowden cable to the throttle before cutting it 2mm past the nipple holder.
The correct size brass nipple was fitted, cable end splayed then the whole thing was heated with a heat gun and soldered.
The same was done for the other cable and then everything was adjusted. In hindsight I needent have given the extra 2mm of cable length but better too long than too short!
That twisted grip will really upset some people.
Squeeze & Bang
Well I didn't really touch the bang much as the NGK spark plugs I am using are superb meaning I had no concerns here. The ignition unit is still doing the business although I did need to replace a broken spade terminal on a block connector. Luckily I had one in my electrical kit so this wasn't too painful.
The squeeze however got a good looking at as my crank needed swapping so it was time to split those cases again.
I had a a crank rebuilt by Grampians with RG
bearings and TZ conrods last year then promptly broke a bolt in it.
This crank was back and ready to go in which I swapped in an evening after work.
Everything inside the engine seemed healthy with a slight mark on the edge of the crown on the right piston being the only concern found.
This new crank should make the engine a lot stronger and resilient at high revs as well as reduce the vibrations felt from the more worn old crank.
Blow
I had plans to build some new pipes but as usual time was not on my side so a lucky find on eBay got me a set of old TZ pipes for okay money. These would doubtlessly not match my porting but these would at least let me get out and ride this March.
 Back at Snetterton in 2016 I realized my header studs were not in the best of health. A temporary fix of doubling up some nuts was my short answer but now it was time to get those broken old studs out.
First I bought a stud extractor and I can tell you it was a revelation! I have used cam type extractors before with mixed results but the Laser 4393 chuck set was an absolute breeze. Just keep turning till the stud comes out, simple.
I had bought some exhaust flanges with the plan to make headers but another lucky break came in the shape of a pair of headers that I loaned from Andy (cheers again Andy). These plopped on the new studs providing a mating surface for my new pipes. I then plopped them back off again so I could turn the studs down a bit more as the studs I had bought were far too long making my run out of thread too soon.
Some 4 inch exhaust springs finished off the look ready to take some pipes.

The pipes married up nicely and with the aid of a spring puller (yes I finally don't need to perform knuckle removing maneuvers with pliers anymore) the springs were stretched into place.
The pipes were hastily wire locked into place and stingers installed for a photoshoot with the team.
This highlighted a common problem with RD's running TZ pipes: Clearance!
My fairing was at quite a pissed angle to get it to fit at all with the pipes on and the stingers sat low and wide. Probably great on a road bike but this would ruin my ground clearance.
I was going to need to come up with a way to tuck these things in and up with metal already touching metal.
Luckily my trusty hammer came to the rescue. I bent the existing mounting brackets on the bike back to the horizontal rather than vertical. The left pipe pulled up nicely to a near perfect fit, the right needed a small bracket to line up the bolt holes which was quickly thrown together.
These pipes need to be rubber mounted so I ordered some nice 10mm rubber dampening mounts. These were very slow in coming however so I ended up with using some rubber tap washers pinched between some M8 washers which did the job nicely.
All this tucking up had caused my headers to not fit too amazingly any more so a good dose of copper RTV was used to seal things up a little better. which helped a little.
In conclusion
For now: that concludes this part of the build.A trip to the dyno was made to tune this lot up as best I could with surprisingly good results.
Some custom pipes will be coming in the future to make best advantage of my porting and hopefully stick all the exhaust gasses out the back rather than half crackling out the front like it currently does.


Comments
Post a Comment