Highbrid Yamaha - the sole

Changing the chassis is a bit of work but I really didn't want to be getting bored this winter so I thought I'd go and mess up my engine as well.
The basic plan stood that I would take my existing RD250D aircooled cylinder heads and mate them with a set of RD250LC cases.
Why? Well you get a better gearbox, but more importantly the cases are fully rubber mounted.
Shakleton the RD250 had suffered greatly with vibration induced lack of structural integrity throughout 2017 so a rubber mounted engine was high on my wish list.
The cases
I started shopping for a set of cases as soon as the season ended but could find nothing under £900!
Andy Green, one of my racing team mates, offered me a set of cases to get started with. They came from the back of his shed but for all my appreciation for his help and generocity, they looked like they had come out of a canal! These things were covered in grime, missing/ bent studs and some rather seized looking internals would all need sorting but I was very grateful to get started. Once I had them home; I soaked the studs in penetrating oil and stuck them in the garage for the next morning.
 A nights worth of soaking and the 'assistance' of a lump hammer got the cases separated the following morning.
Internally they didn't look terrible, with all of the important bits still looking machined fresh. The gearbox forks and selector drum didn't look their best but did come apart with the aid of an impact driver and some heat. The selector rod was also junk with heavily worn splines so one of these was put on order along with a complete gearbox.
The only other bits left were the tacho drive, which went in the bin and a few seals which followed the previous.
This left me the bare cases which were cleaned of old oil, chain gunge, dead invertebrates and vegetation then deposited in the sand blasting cabinet.
The sand blasting cabinet had not had its media refreshed from the last time I used it to muted success and my compressor is still far to small; but a patient and methodical approach to blasting did the job leaving the cases looking a lot less grim than when I had started.

Said piece of goo was clearly someones bodge after putting a hole in the case after a fall and I had taken the trouble of removing it.
No bother I could regoo the hole but this time I was going to use some aluminium which seamed more suitable.
The hole was cleaned up and a small piece of metal was cut roughly to shape to fill in the gap. I then tacked and welded the small piece of metal into place with with my R-tech digital tig 170. Even with the best of cleaning prep I still managed to find some old oil in the cases as can be seen by the soot at the top of the weld but it did glue together nicely in the end.
Robbing peter to make Paul
(making an LC bottom end with bit of AC)
As with everything from this build: I intended to use as much of the old bike as was possible to keep costs down. To do this the old engine would need stripping down which I was now quite well versed at doing.


Glittery oil could well have been a hang over of my output drive gear nut coming undone and eating through the cases at Pembrey but I suspected worse, half of a circlip sat on a gear change fork didn't fill me with confidence either and made me a little more happy to see the back of this engine. It was probably a good thing that my last race at Brands Hatch was drawn short afterall.
A brief moment of doubt with Andy had me panicking my crank wouldn't transplant into the new cases and I would have to build another fairly expensive one for this year too but a quick test showed that my early A/B crank would fit in an LC case comfortably. That meant the crank and clutch would be staying with me.
 The gearbox, selector forks, drum and selector rod (with only a couple of race meets on them) were all of no use as they had been superseded in the newer engine cases.
It is always a little frustrating to spend a lot of time and money on something you don't use for long but hopefully this will be a productive move over to more modern things.

 The LC cases got a quick run through with a tap on all of the threaded holes to make sure there was no crap or sand stuck in there, cleaned again and then I started fitting everything into them.
I was aware that the studs were not in great nick (If not entirely missing) so replacements had been ordered. These were however not in my posession yet so clearly I was going to hit a work stop at some point along this part of the build till they turned up.
I methodically built up the gearbox selector drum, forks and gear shafts with all of their clips and seals.
The neutral switch cover was then fitted on the near side of the engine. I had no intention of using it but it is good for keeping the oil where it should be.
With the retaining plate holding the selector drum on I could slip the selector rod into place with its spring located on a spigot.

I ran the gearbox up and down through ts gears which worked noticably better than the AC engines gearbox did.
I was really starting to look forward to trying this thing out!
 I gave everything a coat of oil to get it started , dropped the crank in the front(locating the guide pins correctly for a change) and then lowed the top casing on.
This was basically as far as I could go as I would want to take the top back off again to remove and refit new studs so I stuffed the holes with paper and got on with something else.
Probably something on the VFR or just getting annoyed at the amount of bike bits that were littering my garage.

After months of nothing but over priced parts, there were suddenly loads of old bottom ends going for sensible money so I grabbed this set.
The studs were okay, cases loads better and more to the point; they were mine, not borrowed.
They didn't need much cleaning up so to keep this blog from turning ito an epic novel; I swapped the lot and bolted it all down.

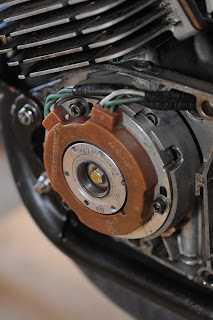
The near side of the case hasn't got loads going on so the ignition system got thrown on, to be adjusted later and wires posted throught the hole.
The other side is a bit busier but for the most part; the old AC parts just bolted on too. The only part that was a bit iffy was the bracket that bolts on behind the clutch. On the AC model it is a three bolt triangle with a circle hole in the middle for the shaft to pass through. On the LC model it only uses two of these bolt holes so although the same bracket fits, it has one end not screwed down. I'm sure it will be fine....
The clutch basket dampers were also a little loose. Another basket was ordered later to replace this but I went ahead and fitted this one anyway. Those two things aside I had the wet side of the engine built and the AC case fitted on nicely.

 Or so I thought. Everything fit great apart from the hole for the water pipe on the LC cases perfectly dissect the gap for the oil pump on the AC cover.
 This made for a more complicated work around than I had tooling for; so off I went to Andy's to pinch his lathe again.
This plug was then stuck in the freezer and the case heated before the two came together with the help of a hammer, perfectly plugging the hole. We were not done with the case yet though as I was soon to find out.

Out came a fresh set of pistons and rings from Grampians which were slotted onto their conrods with a dribble of Motul 800 2T Factory Line Road Racing on the pins, bearings and side skirts to help throught the first few rotations.
Now the barrels slid over the pistons whilst I performed hand yoga trying to hold the rings tightly.
Finally the cylinder heads were plopped on and nuts hand tightened.
 It was about here that another problem became apparent.
The nuts came to a sudden and very definit stop a long way before they got anywhere near the heads.
Shit again!
The LC head studs are longer than the AC ones and I was buggered if I was going to change them at this stage of the build. Sods law said they would snap and/or drop crap into the engine and I didn't fancy any of that!
The first answer suggested to me was to try shorter YPVS nuts. These proved to be too short so we made thick washers for the AC nuts to take up the gap instead.

This should prevent head misalignment during rebuild, which can cause a melted engine.
Of course it opens me up to the dropped pin in the engine = broken engine danger, but I will just need to be more careful.
 Around about now my new engine stand showed up.
These are designed for motocross engines and fit an AC bottom end great.
I will need to modify the forward arm a little for these LC cases but it will no doubt be great for future engine rebuilds, just not this one.
That was basically it for this build.
I would later remove that copper gasket and a penny from the oil pump port for a better looking plate. I would also swap that clutch basket but otherwise the next job was to sling this thing into a chassis.

Back to the casing.
Of course things could not be that simple.For whatever reason, I had not snipped the wirelocking for the oil fill cap so it wasn't till very late in the game that I noticed I hadn't put any oil in the bike yet.
No great matter as that is a 2 minute job, but whilst enjoying my "job well done" cuppa for said job, I spotted oil leaking from the clutch cover casing.
On closer inspection: the front lower edge of the AC casing doesn't quite match the LC lump.
I went to my local emergency parts department (Andy Green's shed) who sorted me out with a spare casing which we plugged up with core plugs and one turned down ally lump.
The dipstick died a firefly death during case heating but otherwise the cases were quite usable for what I needed and a total life saver.
 Once I had the clutch cover home, I stuck the TRD on its side to save what oil I could and stuck the case on.
Confusingly the bolt holes would not line up which puzzled me a bit till I figured out that some oil guide lugs on the inside of the case were fowling the clutch input gear.
These were unceremoniously ground off as can be seen on the left.
Things were then buttoned back up with some new stainless allen bolts supplied from Lincoln Fasteners in Sleaford.

Before I tried putting oil in it clearly.


Comments
Post a Comment